Windows Mobile/CE Add New
You can create new Fixed Assets, Multi Quantity
Assets, Asset Tags, Locations, Departments, Manufacturers and Vendors
on the mobile device. This new data will be transmitted to the Asset Cloud
database in real time where it will become available to all devices and
on the PC.
The only "New" screens that are
accessed directly from the main menu are the New
(Fixed) Asset and New Multi Quantity
Asset screens. For other new information, you can enter the data
in the appropriate field. Asset Cloud will recognize the data as new and
ask you if you want to add it to the database.
New Fixed Asset
New Multi Quantity Asset Complete
version of AssetCloud only.
Sites
must be created on the PC.
New Fixed Asset
- Click on the Assets
> New Asset.
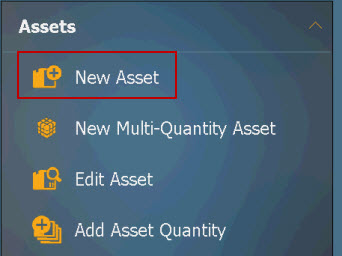
- New Fixed Asset screen will appear.
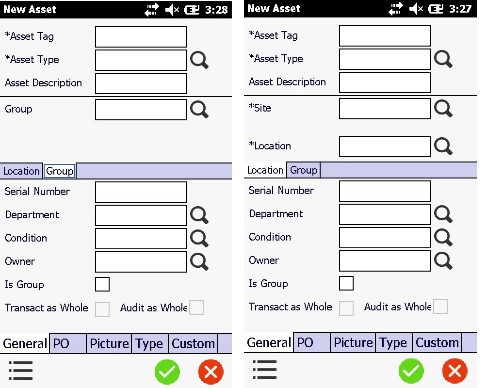
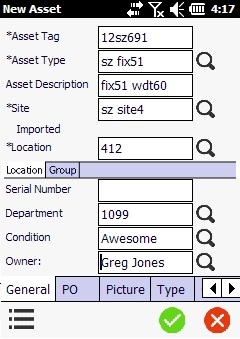
- General Tab
- Enter an Asset
Tag for this asset. This is a required field. Asset tag can
be added using the keyboard or tap the Scan icon to scan a barcode.
- Enter the Asset
Type. The Asset type can be added by clicking on the search
button next to the field. Click on the search button, the screen will
navigate to Search Asset Type
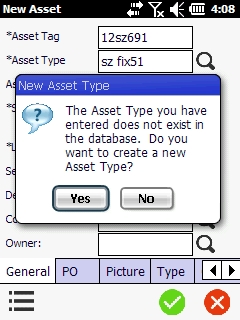
screen where you can search and add the asset type. You can also add
a new asset type by clicking on the 'yes button' in the pop-up
message which will appear on typing new asset type. Refer New
Asset Type.
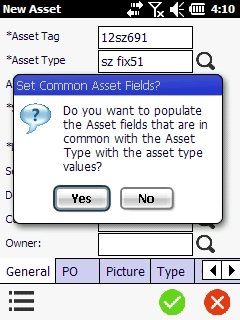
- On entering the Asset type, a message
will appear asking for the permission of the user to populate the
asset fields that are in common with the asset type with the asset
type values. Click on the Yes or No button. On choosing "Yes",
the fields will get populated with the asset type values.
- Enter the Asset
Description.
- Location Tab
- Enter the Site. The Site can be added
by clicking on the search button next to the field. Click on the search
button, the screen will navigate to Search
Sites screen where you can search and add the Site.
- Enter the Location.
The location can be added by clicking on the search button next to
the field. Click on the search button, the screen will navigate to
Search Location screen where
you can search and add the location. You can also add a new location
by clicking on the 'yes button' in the pop-up message which
will appear on typing new location. Refer New
Location.
- Group Tab
- Enter the Group
Tag. The Group Tag can be added by clicking on the search button
next to the field. Click on the search button, the screen will navigate
to Search Group Assets screen
where you can search and add the Group Tag.
- Enter the Department.
The department can
be added by clicking on the search button next to the field. Click
on the search button, the screen will navigate to Search
Department screen where you can search and add the department.
You can also add a new department by clicking on the 'yes button'
in the pop-up message which will appear on typing new department.
Refer New Department.
- Enter the Serial
Number.
- Enter the Condition.
The condition can be added by clicking on the search button next to
the field. Click on the search button, the screen will navigate to
Search Condition screen where
you can search and add the condition. You can also add a new condition
by clicking on the 'yes button' in the pop-up message which
will appear on typing new condition. Refer New
Condition.
- Enter the Owner
Name. The Owner name can be
added by clicking on the search button next to the field. Click on
the search button, the screen will navigate to Search
Employees screen where you can search and add the owner name.
You can also add a new owner name by clicking on the 'yes button'
in the pop-up message which will appear on typing new owner
name. Refer New Owner Name.
- Tap on the "Is
Group" checkbox to make an asset "a group".
Once you check the IsGroup checkbox, the Grouped Asset icon will appear
at the top of the screen. Tap on the icon to add assets.
- You can also enable Transact as Whole
and Audit as Whole feature in the grouped assets screen. Refer Grouped Assets topic.
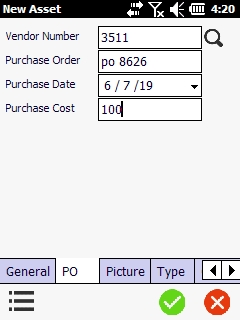
- Purchase Tab
- The Purchase tab is
optional and is for entering purchase order information.
- Enter the Vendor
Number. The Vendor Number can be added by clicking
on the search button next to the field. Click on the search button,
the screen will navigate to Search
Vendor screen where you can search and add the vendor. You
can also add a new vendor by clicking on the '+'
symbol on the Search Vendor screen.
Refer New Vendor.
- Enter the Purchase
Order number.
- Enter the date of this Purchase
Date or click on the Calendar icon to select a date.
- Enter the price per unit for this asset
in the Purchase Cost field.
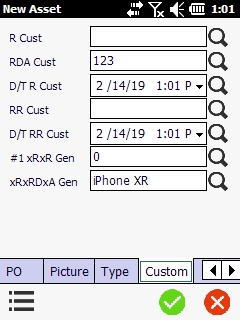
- Custom Tab
- Click on the Custom tab. Any Custom
fields created for Assets on Asset Cloud web will
appear here. Required custom fields will be marked with an asterisk.
Enter the requested information in the fields. If no custom
fields have been created for assets this tab will be blank.
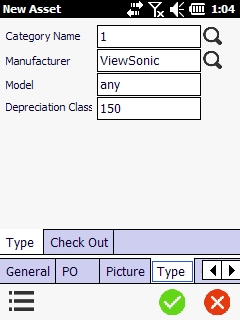
- Type tab
- Click on the Type tab. This
tab displays fields related to the asset type associated with this
asset. If
the When selected... checkbox is selected on the Asset Type screen,
this information will be auto-filled from the asset type. You
can enter or edit information in most fields on this tab even if it
has been auto-filled from the Asset Type.
Type - Type Tab
- Enter the Category
Name.
- Enter the Manufacturer.
The manufacturer can be added by clicking on the search button next
to the field. Click on the search button, the screen will navigate
to Search manufacturer screen
where you can search and add the manufacturer. Refer New
Manufacturer.
- Enter the Model.
- Enter the Depreciation
class.
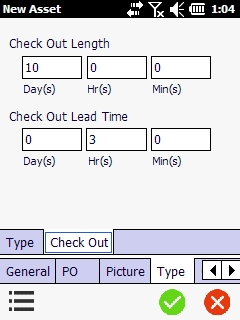
Type - CheckOut tab
- Enter the Check
Out Length.
- Enter the Check
Out Lead Time.
- Picture
- Pictures can be added to the asset by
clicking on the camera icon on the screen.
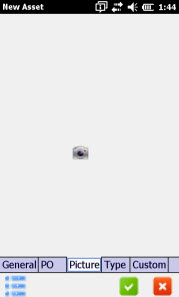
- A pop-up will appear with two options
- Camera and Browse.
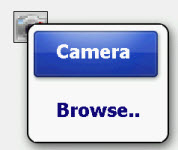
- Camera
- Select this option to access the camera feature on your device.
Take the picture as you normally would on your device, then select
Use this image, or Retake
to discard the current picture and take another. When you select Use this Image the image will be
displayed on the Picture tab.
Images taken via the camera through the Asset Cloud app are not saved
to your device. They are transmitted to the Asset Cloud database.
- Browse
- Select this option to browse for a picture on your device.
The picture you take with the camera or select from the camera roll
will appear on the Attachments
screen
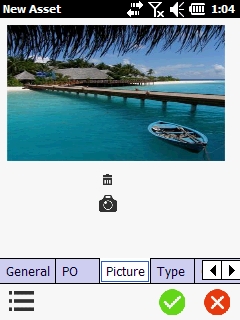
- Click the Trash
Can icon to delete the picture. A confirmation message will
appear. Click Yes on the confirmation screen to delete the picture.
The number of pictures you can attach to an asset is limited by the
number set in Settings
> Mobile > Maximum Pictures Captured. The default
number of captures is 5.
Note:
After uploading data to the PC, any pictures taken via the Android app
will appear as attachments on the Edit
Asset screen > Attachment tab. Pictures taken via the app will
not appear on the Edit Asset screen >
Picture tab by default. You can set an image as default to have
it appear on the Picture tab by
following the instructions provided in the topic New
Asset screen > Picture tab.
- When you are finished entering information
for this asset, tap on the Save
button at the bottom of the screen. On saving, a number will appear
next to the Summary button.
The number indicates the number of assets you have created during
this session.
- Tap the Summary
button to view the summary information. Details of each asset you
have added this session will display.
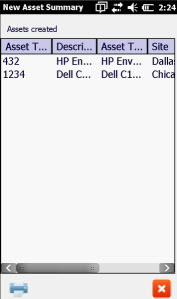
- Select the Asset. Tap on the Print
button to print labels for these assets. The labels will print to
the ZPL printer that is on your network.
Grouped Assets
The Grouped Assets icon will appear once you check the IsGroup checkbox.
Tap on the icon to view the Grouped Assets screen.
Transact As Whole - Tap on the
Transact As Whole radio button,
if required. When the user click on the "Transact as Whole"
checkbox, it means that when you perform a transaction on the child asset
then the parent asset will be auto populated in the transaction grid.
This checkbox/option is not mandatory.
Audit As Whole - Tap on the
Audit As Whole radio button, if
required. When the user click on the "Audit as Whole" checkbox,
it means that when you perform a transaction on the child asset then the
parent asset will be auto populated in the audit grid. This checkbox/option
is not mandatory.
Tap on the Plus icon next to
add assets in the group. The screen will navigate to the Move screen where
you can add assets in the group.
Note: Since the screen navigated
from the New Asset screen to the Move screen to add assets in the group,
note that the newly added fixed asset that you created before adding the
child assets will be saved in the backend. The other option to add assets
in the Group is to access the Transaction
> Move screen.
New Multi
Quantity Asset
Complete
version of Asset Cloud only.
The Add
Multi-Quantity Asset screen is used to enter a new, multi-quantity
asset into the database. A Multi-Quantity Asset is an asset that is not
unique across sites and locations and may have quantity associated with
it. Folding chairs may be an example of a multi-quantity asset. You can
create the asset "Folding Chair" and add quantity to it.
- Click on the Assets
> New Multi-Quantity Asset.
- New Multi
Quantity Asset screen will appear.
- General Tab
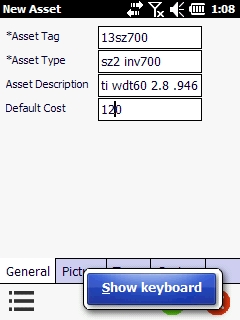
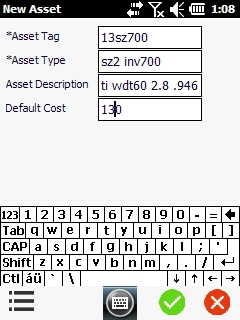
- Enter a unique Asset
Tag for this asset. This is a required field. Asset tag can
be added using the keyboard or tap the Scan icon to scan a barcode.
- An Asset
Type will be automatically created for this asset. Keep in
mind that each multi-quantity asset has it's own, unique asset type.
Therefore, you cannot assign this multi-quantity asset to any asset
type other than the one Asset Cloud automatically creates for it.
Refer Creating New Asset Type.
- Enter the
Asset Description.
- Enter the An Asset
Type will be automatically created for this asset. Keep in
mind that each multi-quantity asset has it's own, unique asset type.
Therefore, you cannot assign this multi-quantity asset to any asset
type other than the one Asset Cloud automatically creates for it..
- Enter the Cost.
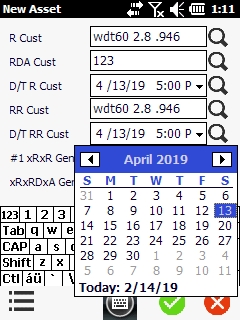
- Custom Tab - Click on the Custom tab. Any Custom
fields created for Assets on Asset Cloud web will
appear here. Required custom fields will be marked with an asterisk.
- Enter
the requested information in the fields. If no custom fields have
been created for assets, this tab will be blank.
- Type Tab -
Click on the Type tab.
This tab displays fields related to the asset type associated with
this asset. If the When selected...
checkbox is selected on the Asset Type screen, this information will
be auto-filled from the asset type. You can enter or edit information
in most on this tab even if it has been auto-filled from the Asset
Type.
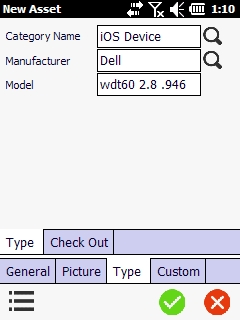
- The
Category fields cannot be
edited here.
- Enter the Manufacturer.
The manufacturer can be added by clicking on the search button next
to the field. Click on the search button, the screen will navigate
to Search manufacturer screen
where you can search and add the manufacturer. Refer New
Manufacturer.
- Enter the Model.
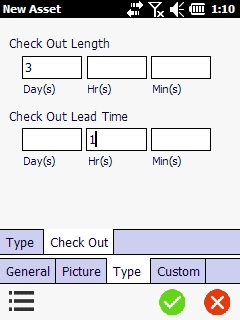
- Enter the Check
Out Length.
- Enter
the Check Out Lead Time.
- Picture
- Pictures can be added to the asset by
clicking on the camera icon on the screen. A pop-up will appear with
two options - Camera and Browse.
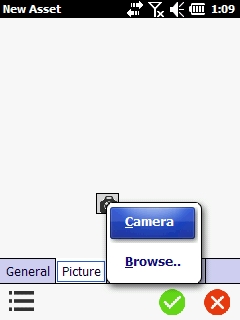
- Camera
- Select this option to access the camera feature on your device.
Take the picture as you normally would on your device, then select
Use this image, or Retake
to discard the current picture and take another. When you select Use this Image the image will be
displayed on the Picture tab.
The Images taken via the camera through the Asset Cloud app are not
saved to your device. They are transmitted to the Asset Cloud database.
- Browse
- Select this option to browse for a picture on your device.
- The picture you take with the camera or
select from the camera roll will appear on the Attachments
screen.
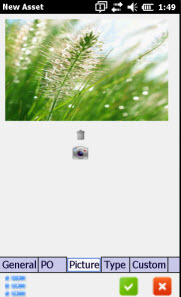
- Click the Trash
Can icon to delete the picture. A confirmation message will
appear. Click Yes on the confirmation screen to delete the picture.
The number of pictures you can attach to an asset is limited by the
number set in Settings
> Mobile > Maximum Pictures Captured. The default
number of captures is 5.
Note: After uploading data
to the PC, any pictures taken via the Android app will appear as attachments
on the Edit Asset screen
> Attachment tab. Pictures taken via the app will not appear
on the Edit Asset screen > Picture
tab by default. You can set an image as default to have it
appear on the Picture tab
by following the instructions provided in the topic New
Asset screen > Picture tab.
- When you are finished entering information
for this asset, tap on the Save
button at the bottom of the screen. On saving, a number will appear
next to the Summary button.
The number indicates the number of assets you have created during
this session.
- Tap on the Summary
button to view the summary information. Details of each asset you
have added this session will display.
- Select the Asset. Enter the number of copies
to and tap on the Print button
to print labels for these assets. The labels will print to the ZPL
printer that is on your network.
New
Asset Type
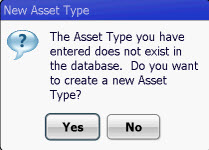
When you enter new data into the Asset
Type field when creating a fixed asset, Asset Cloud will recognize
it as new and the following prompt will appear. Tap on the Yes
button to access the New Asset Type
screen.
Enter the following details:
- Asset
Type - This field is required. The asset type is a category
for assets and is required to create new asset types. Assets are assigned
to a specific asset type. For instance, you may have an Asset
Type of Label Printers that defines the manufacturer, size specs,
etc. of this particular type of printer. Then specific printers of
the same type are assigned to the Label Printers asset type. Asset
Tags must be unique across all Sites and Locations. A particular value
can occur only once in the Asset database.
- Asset
Type Description - Enter a description for this Asset
Type.
- Depreciation
Class - Select the Depreciation Class. Refer Add
a depreciation class.
- Category
Name - Enter a category for this asset. To create a new category,
click on the <New> option from the dropdown menu. New Category
screen will appear. Enter or scan the Category and save it.
- Manufacturer
- Scan a manufacturer or tap the Magnifying Glass icon to search manufacturers.
You can create a new manufacturer by entering new information in the
field.
- Model
- Scan or enter a model number.
- Check
Out Length - The default number of Days, Hours and/or
Minutes assets of this type may remain checked out before they are
overdue.
- Check
Out Lead Time - Indicates how long after an asset is checked
in before it is available. The lead time allows time for recalibration,
cleaning, etc.
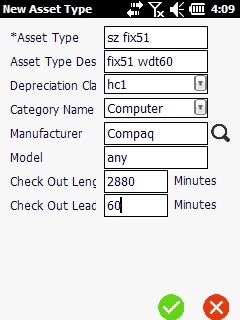
Tap on the Save button when
you are done. The screen will navigate to the New Fixed Asset screen.
New Location
- When you enter new data into the Location field Asset Cloud will
recognize it as new and the following prompt will appear. Tap on the
Yes button on the prompt to
create the new location.
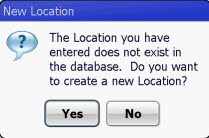
- New Location screen will appear.
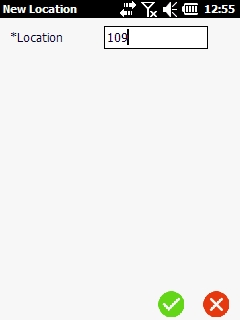
- Enter the location. Make sure to enter
the name of the Location correctly
as it cannot be updated in the device.
- Click on the Save
button.
New Department
- When you enter new data into the Department field Asset Cloud will
recognize it as new and the following prompt will appear. Tap on the
Yes button on the prompt to
create the new department.
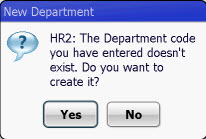
- New Department screen will appear.
- Enter the Department
Code and Department Name,
then click the Save button.
New Manufacturer
- When you enter new data into the Manufacturer field Asset Cloud will
recognize it as new and the following prompt will appear. Tap on the
Yes on this prompt to save
the new manufacturer.
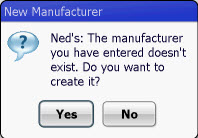
- On Saving, a message will appear indicating
that a new manufacturer has been created. If you want to add that
as a new manufacturer. Click on the Yes button or click on the No
button.
- To add additional data to this manufacturer,
such as address and phone information, you will need to do so on the
PC.
New Vendor
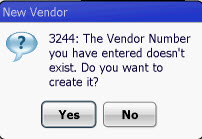
- When you enter new data into the
Vendor field Asset Cloud
will recognize it as new and the following prompt will appear. Tap
on the Yes button
on the prompt to access the New
Vendor screen.
- New Vendor screen will appear.
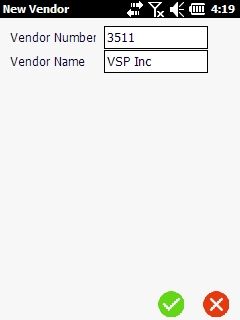
- Enter the Vendor
Number and the Vendor Name
(optional), then click the Save
button.
New Owner Name
- When you enter new data into the
New Employee field Asset
Cloud will recognize it as new and the following prompt will appear.
Tap on the Yes
button on the prompt to access the New
Employee screen.
- New Employee will appear.
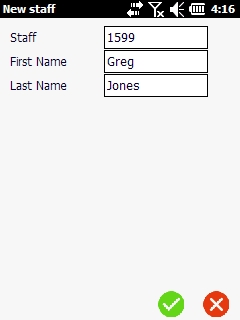
- Enter the Employee Number, First and Last
Name of the employee.
New Condition
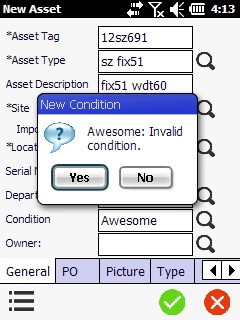
- When you enter new data into the Condition field Asset Cloud will
recognize it as new and the following prompt will appear. Tap on the
Yes button on the prompt to
create the new Condition.
- New Condition screen will appear.
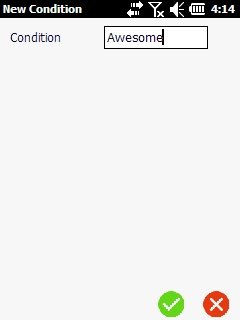
- Enter the Condition. Make sure to enter
the name of the Condition correctly
as it cannot be updated in the device.
- Click on the Save
button.


