Quick Maintenance
The Maintenance page allows performing Quick Maintenance and Schedule Maintenance on an asset. This screen will enable you to link the asset to a task and then assign the task to a person for performing a quick maintenance activity. Hence, quick maintenance can be performed only on one asset and one task.
The Maintenance activity can be performed only on the Fixed assets. To create a Fixed Asset, refer to Add Fixed Asset.
View Maintenance
New Quick Maintenance
Edit / Perform Quick Maintenance
Delete Maintenance
View Maintenance
- Click on Maintenance > Quick Maintenance.

- View Maintenance screen will appear. The screen will display the list of tasks, asset tag, assigned user, due date, start date, status, and maintenance type.

- Use a Show Filter option to view a particular task, asset tag, assigned user, due date, start date, status, or maintenance type. When you click on the Show filter checkbox, a text box will appear under each field where you can type the search text to find the desired detail.

New Quick Maintenance
- Click on Maintenance -> Quick Maintenance ->
 .
.

Or
Click on the Maintenances -> Maintenance -> View Maintenance screen -> New button.

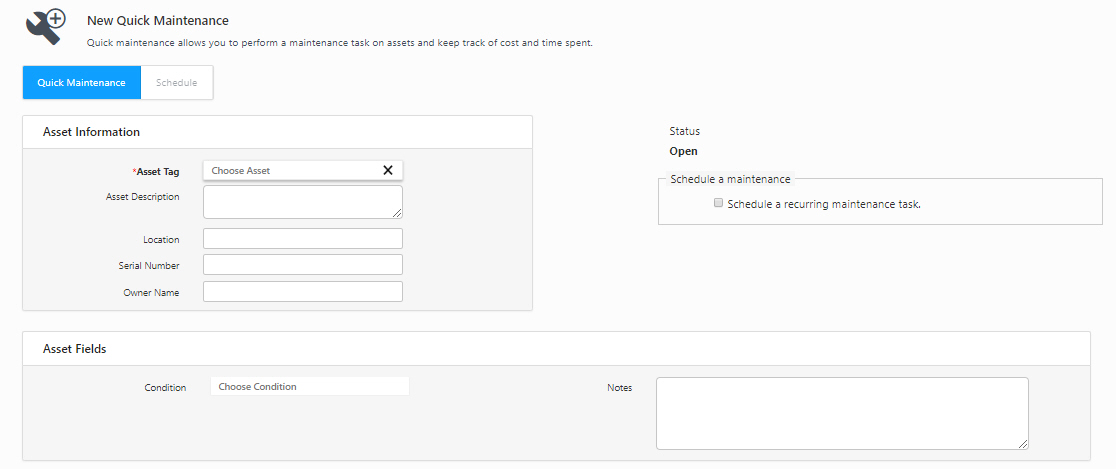
- New Quick Maintenance page will appear.


Asset Information
- Enter or select the Asset Tag (mandatory).
- Once the Asset Tag is entered/selected, the following field will get automatically populated - Asset Description, Location, Serial Number, and Owner Name.
- Schedule maintenance - If you want to link the Asset to schedule maintenance, click on the Schedule Maintenance checkbox before saving. You cannot check the "Schedule a recurring maintenance task" checkbox on the Edit Quick Maintenance screen.
Asset Fields
- Select the Condition of the Asset (mandatory).
- Enter Notes, if any.
Task Fields
- Select/Enter the Task Number (mandatory). The Task Description field will be populated automatically based on the Task selected.
- Select the name of the person to whom the task needs to be assigned in the Assign To field.
- The "Assign To" person will get a notification through the notification tab or e-mail.
- Enter the Time spent on Day (s): Hours (hrs): Minutes (mins) on the maintenance activity.
- Enter the total Cost for the maintenance activity.
- Select the Due date and Time using the calendar and the clock.
- Click on the Add Notification button to set triggers and configure alerts. Refer to New Notification.
- Click on the Save button.
- A message will appear indicating that "Quick Maintenance is created successfully."

Edit /Perform Quick Maintenance
- Click on the Maintenance -> Quick Maintenance -> View Maintenance.

- Click on the Asset Tag link.
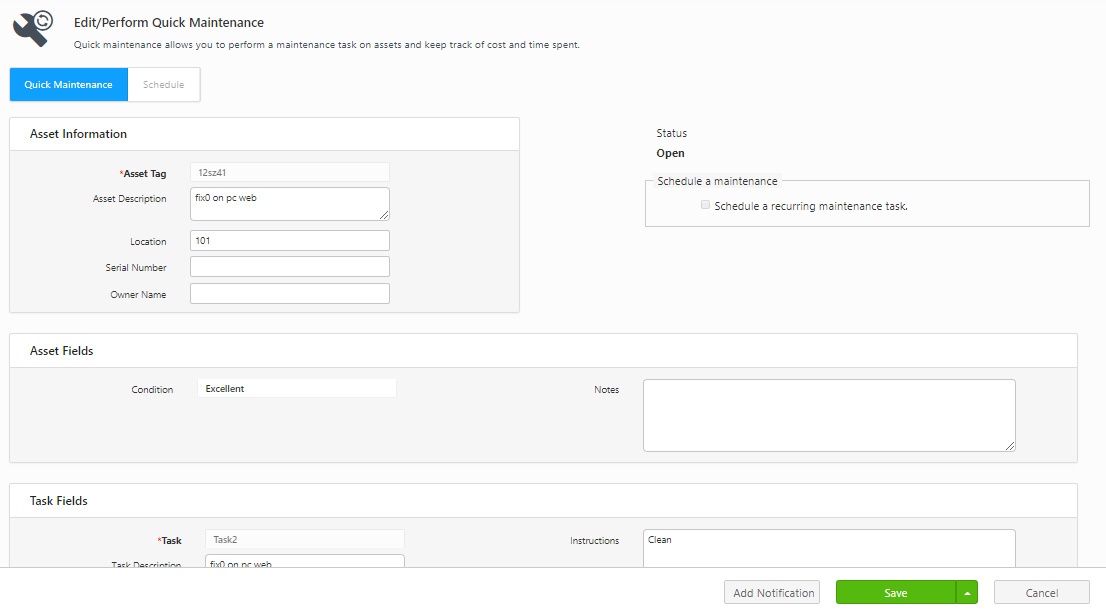
- The screen will navigate to the Edit/Perform Quick Maintenance page.
- You can edit Asset Fields, Task Fields (instruction field will be read-only), and Maintenance section. The Asset Information section will be read-only. Make the required changes. You can also update Schedule Maintenance by clicking on the Schedule tab.
Note - You cannot check the "Schedule a recurring maintenance task" checkbox on the Edit Quick Maintenance screen. If it is unchecked, the Schedule tab will be disabled.

- Click on the Save button.
- There is a drop down button next to the Save button with an option " Close Completed" and "Close Incomplete." Update the maintenance activity by clicking on any of these buttons.

- If the user clicks on the Close Complete button, the status in the Edit/Perform Quick Maintenance page will be Closed -Completed.
- If the user clicks on the Close Incomplete button, the status in the Edit/Perform Quick Maintenance page will be Closed -Incomplete.
Note: In case of a Schedule Quick Maintenance, if the work is completed before the scheduled date/time and when you click on the Close complete button, a pop-up message will appear indicating that "Due date and completion are not the same. Do you want to update the schedule?". Click on the Yes/No button. If you click on the Yes button, the screen will navigate to Edit/Perform Quick Maintenance >Schedule tab where you can update the Recurrence details i.e., you can update the due date and re-occurrence details. If you click on the NO button, then there will not be any change in the due date.

Delete Maintenance
- Click on the Maintenance -> Quick Maintenance -> View Maintenance.
- Click on the Delete button.

- A pop-up message will appear asking for confirmation.

- Click on the Delete button again.
- A message will appear indicating that "1 maintenance deleted successfully".


 .
.


