Move Asset
The Move Asset function is used to relocate an asset or assets from one location to another.
You can also move assets using Android and iOS devices.
Note:
- Capture Transaction Geo Location Settings - If the Capture Transaction Geolocation is enabled, then the Geolocation - View Map link will appear on the History screen, once you complete the Move transaction. Refer to the topic - History - View Map.
- Note on Custom Fields: If there are custom fields that are not filled and are marked as required and read-only, then the user without the Edit Read Only permission will not be able to add/edit the values in the custom field or move the asset to the queue. In this case, a notification message will appear indicating to the user that the administrator has marked this field as read-only. Refer to the topic Edit Read Only Fields for more details.
- Click on the Transactions > Move.
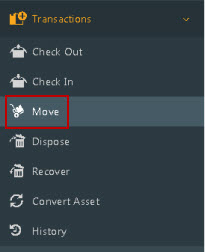
- The Move screen will appear.
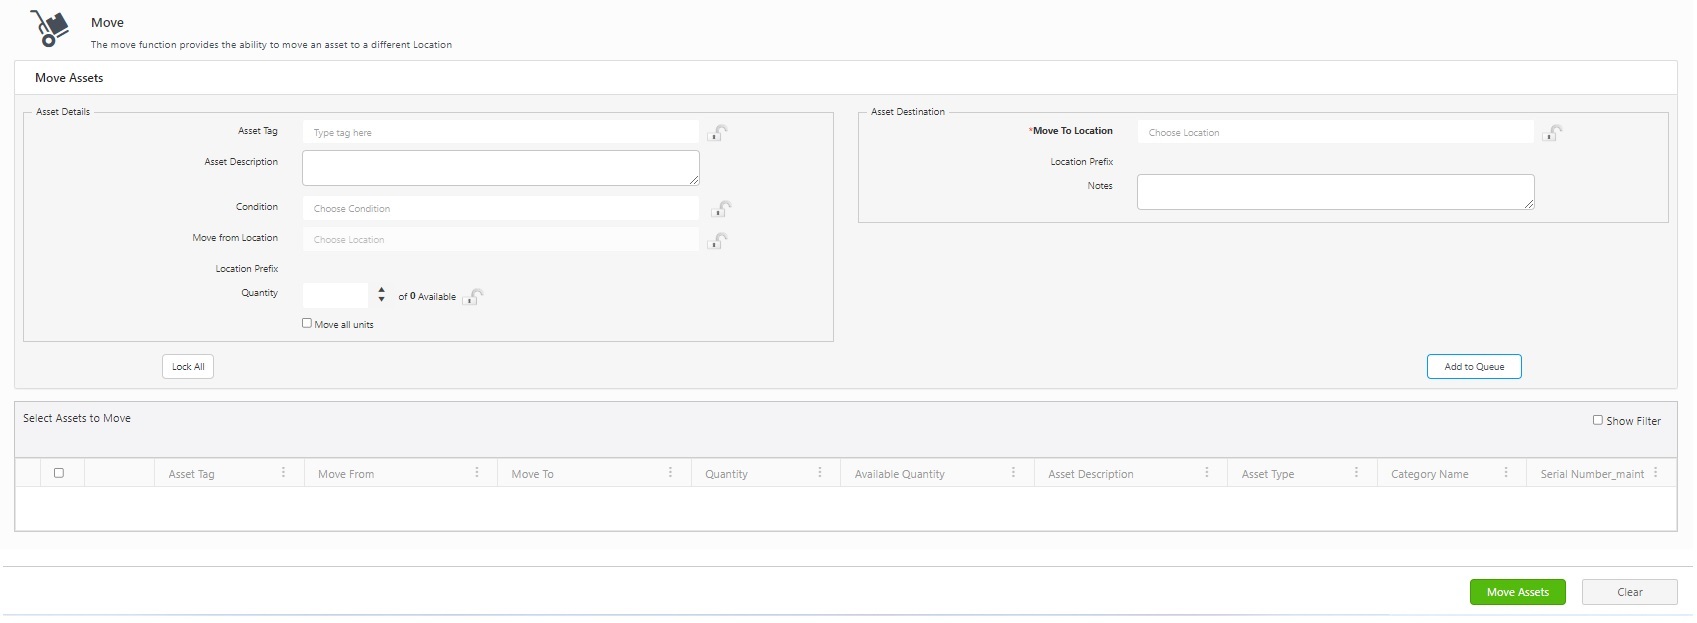
Note that certain fields on this screen have the option to be "locked." When a field is in the locked state, it will preserve the data you've input for future transactions. This feature comes in handy when you're either adding multiple assets to a specific location or checking out several assets to a single customer. To lock a specific field, simply click on the lock icon. If you want to lock all fields with this icon at once, you can use the Lock All button for quick action. Conversely, if you wish to unlock all the fields to allow for new information, you can select Unlock All.
For guidance, click here for information on how to lock fields.
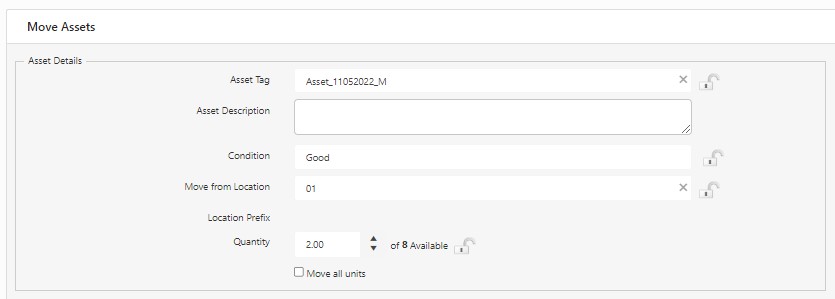
Move Assets - Asset Details
- Asset Tag - Enter/select the asset tag. A Group Widget will appear if the selected asset is a "Group" or an "Asset in a group". Also, refer to Transact As Whole topic.
Note: Please be aware that once you enter/select the asset, it will automatically move to the Select Assets to Move Queue at the bottom of the screen. In the case of Multi Quantity assets placed at multiple locations, the assets will not move to the Select Assets to Move Queue. Also, note that if there is a custom field, the assets will not move to the Select Assets to Move queue automatically.
- If the selected Asset is in a Group and the Transact as Whole feature is enabled for that Group
- The group containing the asset has the "Transact as Whole" feature enabled. When you select an asset (i.e., a child asset), the asset tag field will automatically select and display the parent asset containing the child asset. A Group Widget icon will appear next to the asset tag field in the checkout queue. Also, you can select the child asset using the group widget and proceed with the move transaction.
Example - Consider three groups - Container 1, Container 2, and Container 3. Container 1 contains assets FA_1, FA_2, and FA_3.
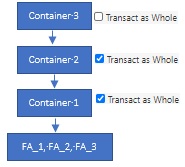
Container 1 and Container 2 have the "Transact as whole" feature enabled.
If you select FA_1, the parent group i.e. Container 2 with the "transact as whole" feature enabled, will get selected.
Note that you can also select FA_1, Container 1, or Container 3 using the group widget.
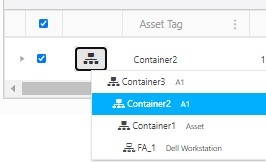
- If the selected Asset is in a Group and Transact as Whole feature is disabled for that Group
- When you select an asset (i.e., a child asset), and the "Transact as Whole" feature is disabled for the parent asset or group, the asset tag field will display the child asset. It will not swap the child asset with the parent asset. You can also select the parent asset using the Group Widget icon.

- If the selected Asset is a Group and Transact as Whole feature is enabled for the Group
- The asset that is a group has the "Transact as Whole" feature enabled. When you select an asset that is a group, the asset tag field will verify all the parent assets and select and display the parent group with the "transact as whole" feature enabled. You can select the sub-group/sub-group without sub-items using the Group Widget icon.
Example -Consider three groups - Container 1, Container 2, and Container 3. Container 1 contains assets FA_1, FA_2, and FA_3. Container 1 and Container 2 have the "Transact as whole" feature enabled.

Suppose you selected Container 1, the parent group, i.e., Container 2, with the "transact as whole" feature enabled, will get selected and displayed on the asset tag field. Note that you can also select Container 1, Container 1 with no sub-items, or Container 3 using the group widget.
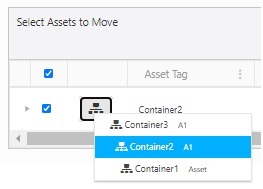
Similarly, if you select Container 2, the asset tag will select Container 2 as the parent "Container 3" has the "transact as whole" feature disabled.
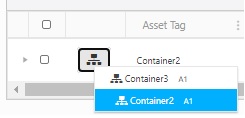
- If the selected Asset is a Group and Transact as Whole" feature is disabled
- The asset tag field will select the group.
Example - Consider three groups - Container 1, Container 2, and Container 3. Container 1 contains assets FA_1, FA_2, and FA_3. Container 1 and Container 2 have the "Transact as whole" feature enabled. The "Transact as Whole" feature is disabled for Container 3
If you select Container 3, the asset tag will select and display Container 3 with no sub-items. Note that you can also select the whole group.

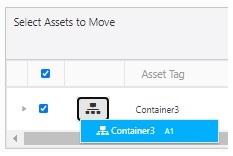
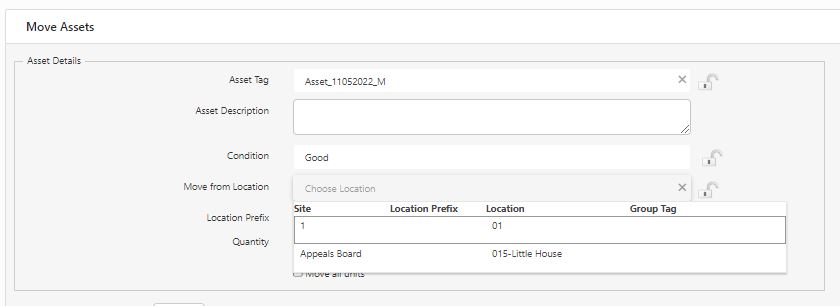
- Move From Location - Select the Move From Location field. This field will be enabled if the multi-quantity assets are placed at multiple locations. Note that The Move From Location field will display the Site-Location /Site-Parent Location - Location on hover.
Note: Move From Location for Multi Quantity asset can be a parent or group instead of the normal location.
- Quantity - Enter the Quantity (for MQ assets, for Fixed Asset, the quantity will be 1). The total number of assets available to move will be displayed next to the Quantity field.
- Move All Units - If you want to move all units of this asset, select the Move All Units checkbox.
Move Assets - Asset Destination
- Move To Location - Select the Move To Location. Note that The Move To Location field will display the Site-Location /Site-Parent Location - Location on hover.
Note: Move To Location for Multi Quantity asset - The To Location can be a parent or group instead of a normal location. Move to Location is mandatory. You cannot move the assets to the queue without selecting the Move to location field.

- Enter Notes, if any.
Custom Fields
A custom field for an asset can be added through Form Customization. Refer to the topic Adding Custom Fields on the Form Customization page. Now you can make the custom field visible and/or required for the Transaction screen. If the custom field is visible or required or both, then the Asset Details section of the Move screen will display the custom field.
- Enter the values in the Custom field.

Add to Queue
- Click on the Add to Queue button.
Note: This button is used if you have entered Move From Location and Quantity under Asset Details.
Select Assets to Move
- The Quantity for the Multi-Quantity assets can be updated by clicking on the Quantity field. The number available to move will appear under the Available Quantity.

- The Quantity for the Fixed Assets will always be smaller or equal to 1. if you try to increase the asset quantity, a message will appear indicating that the "Quantity should not be greater than the Available Quantity".

- To update any of the fields, select the row in the Select Assets to Move queue, and the selected asset's details will appear in the Asset Details section. Update the required information and click on the Update button.
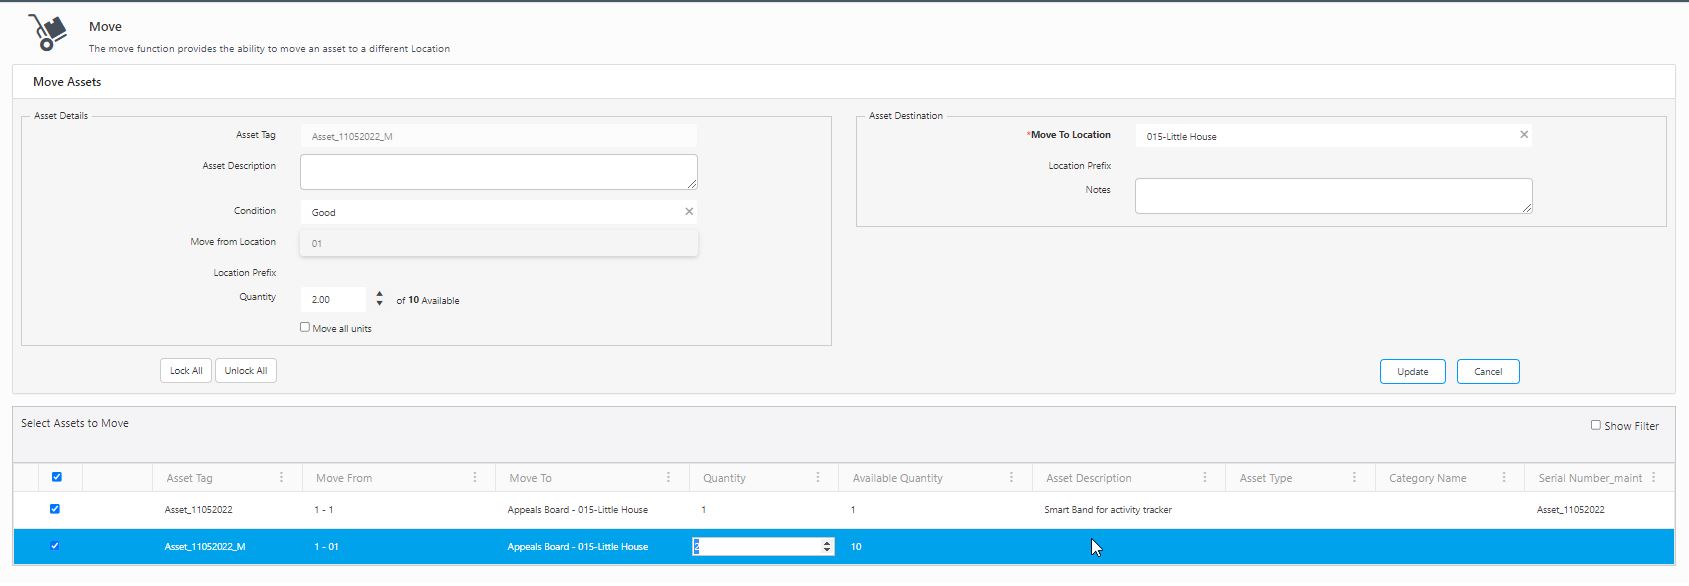
- Move From & Move To Column - On hover, the Move From & Move To column will display the Site-Location details of the asset.

- You can add more assets to the queue. In the Move Queue, there will be a Group Widget icon next to the Asset Tag field. Refer to Step 3 and Group Widget's topic for more details.
Note: Keep in mind that the assets will be moved to the new location only after clicking on the Move Assets button. Also, note that the Move transactions are limited to 50. This means that you can only move 50 assets in each Move transaction.
Note: The Group Widget prevents users from performing transactions on the same asset/group twice. It will recognize the colliding records and un-checks all other colliding records, leaving only the most recent record changes checked. Hence, the same asset cannot be added more than once.
- If a parent Group is already added in the grid with the "Transact Whole" attribute and you add any of its child assets, then the parent asset is unchecked and showing an error sign, and the child asset gets added at the top.
- If a child is already added in the grid and you add the parent asset with the "Transact as Whole" attribute, then the child asset is unchecked and shows an error sign, and the parent asset gets added in the grid at the top.
- If the parent asset is not "transact as whole " you can add both parent and child assets.

- Click on the asset in the Select Assets to Move queue, and the details will appear in the Asset Details section, update the required information and click on the Update/OK button. A message will appear indicating that "Asset Details updated successfully."
- Click on the Move Assets button. A message will appear indicating "Completed a Move on 1 Asset (s)".


![]()


