Android Quick Check Out
The Quick Check Out transaction allows you to quickly check-out the assets to a customer, employee, or vendor without entering many details. There are two options to check-out the assets and they are - Check Out and Quick Check Out.
Quick Check Out is used when you have many assets you want to check-out to different customers/employees/vendors without worrying about a receipt or a signature on each transaction. Quick Check Out screen will allow you to check-out the asset directly. The screen will not have a summary screen or the option to collect the signature/ receipt.
Note: Quick Check Out will be disabled if Require a Signature on Device is set to Yes in the Mobile Settings.
Note: Make sure to enable the Capture Transaction Geolocation under settings to capture the Geolocation of the transaction operation.
Quick Check Out
Tap on the Transactions > Quick Check Out.
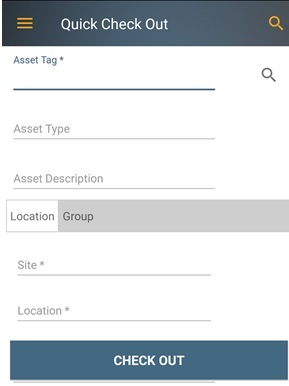
The Quick Check Out screen will appear.

Note:
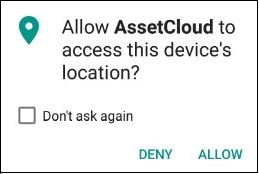
- If the Capture Transaction Geolocation under settings is enabled, a pop-up message will appear asking the user to allow the application to access the device's location. Click on the Deny or Allow button.
- If you click on the Allow button, the application will enable the device's location feature and then this pop-up message will not appear again throughout the transaction operation.
- If you click on the Deny button, then the pop-up message will again appear after entering the Asset Tag.

- Fields that are followed by an asterisk (*) are mandatory. Also, you can lock the field, refer Android Pinning Data topic.
- The Magnifying Glass icon at the top of the screen navigates to the Search Asset Tags screen. The Magnifying Glass icon next to a particular field will navigate to the Search screen of that particular field. For example, the Magnifying Glass icon next to a location field will navigate to the search location screen.
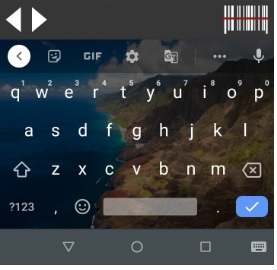
- You can use the keyboard to enter the information in any field. Or If you want to scan a barcode, use the Barcode scanner. Tap on the Barcode symbol, the scanner will appear. Scan the barcode and the field will display the scanned barcode number.

Enter or scan the Asset Tag or click on the magnifying glass icon to access the Search Asset screen. Search for the asset and tap on the asset tag number.
- If the selected 'Asset' is in a group i.e. a child asset and "Transact as Whole" feature is enabled for the Group - The asset tag field will automatically select the group (i.e. the parent) containing this asset. The View Group button will display all the grouped assets. Example: Consider that HP Charger is a child asset for HP Laptop and Transact as Whole is enabled for HP Laptop. On selecting HP Charger, the asset tag will automatically select HP Laptop.
- If the selected 'Asset' is in a group i.e. a child asset and "Transact as Whole" feature is disabled for the Group - The asset tag field will display the selected asset. The Group Tag field under the Group tab will display the group name (i.e. the parent asset). Example - Consider that Plastic Case is a child asset of Mobile. If you select Plastic Case, since Transact As Whole is disabled for the Group (i.e. Mobile) containing Plastic Case, the Asset Tag will display Plastic Case and From Group will display Mobile.
- If the selected asset is a 'Group (parent asset)' and "Transact as Whole" feature is enabled for a group - The asset tag field will select the whole group i.e. all the sub-items will be checked-out by default. Example: Consider that there are 3 groups - Container 1, Container 2, Container 3. Container 1 and Container 2 are Transact as whole. If you select Container 1, the parent group i.e Container 2 with transact as whole feature enabled will get selected.
- If the selected asset is a 'Group (parent asset)' and "Transact as Whole" feature is disabled for a group - The asset tag field will select the whole group. The View Group button will display the grouped assets. Example: Consider that there are 3 groups - Container 1, Container 2, Container 3. Container 1 and Container 2 are Transact as whole. Container 3 is not transact as whole. So on selecting container 3, the whole group gets selected.
The Description, Site, and Location will populate based on the Asset Tag entered. It will be a read-only field.
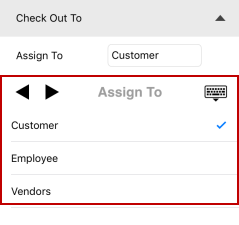
Select the Assign To field. The options are Customer, Employee, and Vendor.
Note - Assets can be checked out to customers, employees, or vendors. By default, the Check Out screen is set to Customer. You can switch to Employee or Vendor by clicking the down arrow in the Assign To field. A screen will appear allowing you to select Customer, Employee or Vendor.

Enter the Employee / Customer / Vendor name. Scan or enter using the keyboard or search for an Employee, Customer or Vendor. You can also add a new employee / customer / vendor name by clicking on the "+" SYMBOL IN THE SEARCH SCREEN.
A message will appear, indicating that the asset is successfully checked out.


